
Hey Everyone! Recently, I have had a couple friends and family members request specific cards to be made and purchased. I’ve been doing a lot of thinking during this process, because there are definitely stresses that can occur when someone asks “hey, can you make me 5 nearly identical cards?”. I’ve navigated through the process, and have come up with a system that works well for me, which of course made me want to share it with you!
I’ve consolidated my process into 5 different tips and tricks for you to use if you ever find yourself in a similar situation! I’m also going to be inserting my own personal opinion throughout this post as well in regards to what I will refer to as commissioned projects, meaning projects I make for people who are paying for specific themes/designs.
I will also preface with a little bit of insight. When I sell any of my cards, my standard price for an A2-sized is $5. I would change this price depending on if it has any sort of interactive elements, and if I’m creating the card in a larger size.
I also view creating commissioned cards as a different experience than making a card “for myself” (or rather, a card that I make with mo requests that just gets added to my stash). While I still will sell these for the same $5 amount, I’m ok parting with a “for myself” card at that price, even if it takes longer, as it’s almost a happy coincidence that someone wants to buy something I had fun making for myself.
Most importantly, these steps may go against your personal creation process. The truth is, they go against mine too. I will happily spend multiple hours on a single project to complete it. Whenever I approach a mass production situation, my first question is “how can I save time?”, which will be discussed multiple times throughout my post.
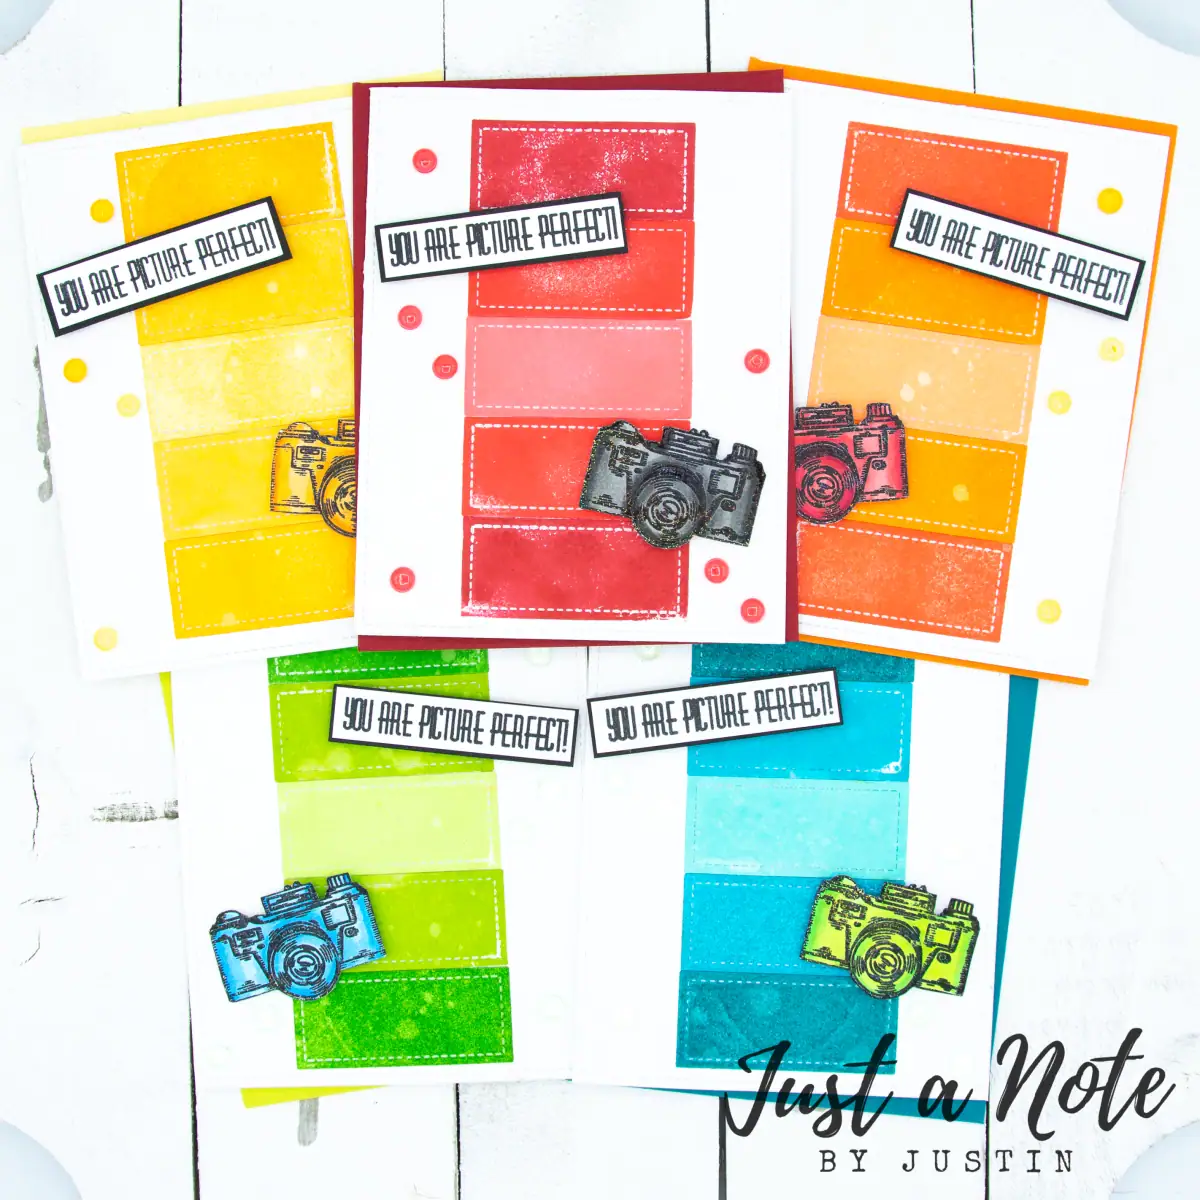
Also, if you’re interested in details regarding the 5 camera card collection above, I’ll provide those near the end of the blog post!
So, in no particular order, here we go!
1. No/Minimal Coloring
One of the biggest time consuming parts of creating a card is the coloring process. Not going to lie, depending of the image, it can easily take me between 30-60 minutes to color up a single character with my Copic Markers.
When you’re making mass produced cards, think of this. How much is your customer spending for this order? Subtract a rough idea of your materials from this cost. Then, divide it amongst how many hours you’re spending on creating them. The fact is, most of us are going to find that we’re probably making these cards and earning maybe $3-$6 per hour (honestly, some of us may even be less than $3).
By adding on colored images to my projects, I am adding 30-60 minutes for every single image colored across every card. That adds up. And unless you’re charging more for colored images on your card, I say it’s a waste of time.
Here are my alternatives for coloring your projects:
- Stamp and heat emboss on colored cardstock. This will give a nice contrast of color, and the heat embossed lines will really give your project one of those finished edges (finished edges is one of my personal pillars of creating).
- Use a “quick coloring” method. For me, this usually consists of limiting my Copic Markers to only 3-4 colors at the most, which I use to give that nice ombré/highlight and shadow effect.
Pro Tip: Die cut your images if you can. This will save you time and give you that clean finished edge on images. Fussy cutting is fine, but we’re human and prone to making mistakes. Depending on your image and how many you have to color, it can really increase your total time spent working on your projects.
2. Clean and Simple Designs are Key
Now, I don’t mean that your projects have to include heavy amounts of white card space. Not that excess white space can’t be effective, but it just might not be your personal style.
Try keeping your design elements to a minimum. Maybe each focal image has a single die cut behind it to make it pop, and you put the sentiment on a banner. Those all take time to cut out and place (and if you’re like me, you also distress the edges of your dies with ink or blend them entirely).
I’m going to give you a great tip that should make really any crafter with a craft stash happy: It’s time to break out that patterned paper!
In lieu of a lot of empty white space on your card, why not let it be empty but with a pattern? I feel like I give my patterned paper new life when I can use them on mass produced cards. I can entirely exhaust a single 12″ x 12″ sheet that has been in my stash for longer than I’d like to admit, AND I can make money on it!
Pro Tip: This is a great opportunity to break out those dies with stitched edges. It gives your project a finished edge that people will be impressed with. And, honestly, you could keep it super simple, and just used an A2-sized panel with a stitched edge. I love this Lawn Fawn Stitched Rectangles set to use for my A2 panels!
3. Embellishments Are Your Friend
A great way to make a mass production project look detailed and high quality while also keeping your cost low is by using your embellishment stash. These embellishments can also add some design aspects into those emptier spaces of your cards that I mentioned above. What’s also great is that you don’t have to worry so much about their placement on your project. As all the cards are roughly the same, once you embellish one card, just embellish the others in the same way!
When embellishing, a lot of people have their own different methods of how to properly embellish their card. The truth is, everyone has their own style. I’ve picked up a couple embellishment tips along the way, so of course I’m gonna share those with you!
- Use odd numbers. Without pulling proper citation, I know that a rule of design is that odd numbers tend to draw ones attention more than even numbers.
- Only go way overboard on embellishments when it’s entirely intentional. Some project I’ve made, I cluster several embellishments together because that’s the look I’m going for. Otherwise, if I just want to add a little extra flair to my project, I like to keep my total embellishment count anywhere from 3-9 ideally. Keeping your overall embellishment count low will also minimize your total cost.
- Use different sizes and different types of embellishments for added interest. One type of embellishment that is fantastic for variety is the Sparkletz blends by Buttons Galore.
In regards to what types of embellishments to use, I would advise using whatever you have a lot of, but also embellishments that aren’t overly large. In the event that your customer requests specifically large embellishments, please make sure to ask them if they are intending on mailing the card. If they are mailing the card, please advise them to use additional postage (as card makers, we all know how postage works. Non-card makers may not).
Some of my favorite embellishments to use are the Sparkletz blends by Buttons Galore, Enamel Dots (I love my Stamp Anniething Enamel Dots), and really, anything I’m itching to clear out of my stash. I actually find it fun to find ways to use my older products for Commissioned Projects. It makes me feel good for using them, and also creates room for new goodies, eventually!
Pro Tip: When using embellishments, make sure that you have a good adhesive to use with them. I love Art Glitter Designer Adhesive and Kindred Stamps Liquid Adhesive for my embellishment adhesive. You don’t want to hear about how your embellishments fell off the card when your customer went to use them.
4. Pick Simple Color Palettes
An easy strategy to point you in the right style direction for mass produced cards is to think about a simple color palette that you can use for your projects.
Now, your customer may have asked you for specific colors to be used. If that’s the case, this step can be mostly skipped, though you may need to pick specific shades of that color to use, or other colors it coordinates with regarding your design.
I always think it’s a good idea to ask your customer if they are wanting the cards to be masculine, feminine, or gender neutral. If you forgot to ask, go with the gender neutral option (which, for me, generally means avoiding pinks and some shades of purple).
For whatever reason, I tend to use Catherine Pooler’s Dye Inks when creating my mass production cards. The ink pads are super juicy, and work so well for blending and smooshing, which I do a lot of when I make mass production cards.
Pro Tip: Layered Stamps are really easy ways to create gorgeous mass production cards, and will also reinforce your color palette. I have found that Altenew has a wonderful collection of layered stamps that work well, and you will most likely find a use for them outside of just your 1 mass production collection.
5. Be Open and Honest with Your Customer
Here’s the downside of creating commissioned projects. Often times, your customer will have a rough idea of what they want, which can be just as frustrating as them knowing exactly what they want. I always like to give a disclaimer whenever someone asks me to create them something, which is typically along the lines of this: “Just remember that what I’m making is handmade. Rarely, if ever, will it be perfect.” This is not to be used as an excuse to justify my sloppiness, but rather think about how many factors come into play that, as a human, we can very rarely create an exact replica of a card, regardless of whether or not we created the original example or not.
There’s also a chance that your customer may ask you for something that you just don’t have. I don’t necessarily encourage you buying a brand new set because someone wants to buy 5 cards with koi fish on them, for example. By all means, if it’s a stamp set you know you would purchase for your personal use, that’s different. But you don’t need to spend all the money you’re going to be potentially making on materials that may never get used again. Feel confident that it’s ok to tell your customer “I don’t have a koi fish. However, I do have these few sets that contain other types of fish. Do you like any of these?”
Also, you may need to explain to a customer how a stamp works. Funny to think about, right? For example, your customer may not understand that you aren’t able to change a stamp’s hairstyle.
Feel free to direct these conversations with customers in the direction you feel they need to go, and set some mental boundaries regarding what you’re able to make.
Bottom line: if your customer is asking for something that you don’t believe you can do effectively, it’s best to tell them early on so you can come up with an alternative.
Pro Tip: Talk deadlines with your customer. Feel free to ask them when they need these projects by. Also feel free to give them what your timeline looks like. It’s not fair for someone to ask you to make them 5 cards that they need in 2 days if you don’t have the time. On the flipside, it’s also not fair to your customer if you’ve promised them a deadline if you’re unable to fulfill (yes, life happens of course, I mean this as a general business rule).
Bonus Tip! 6. Get a “Created By” Stamp for the back of your cards!
I know a lot of us card makers have one of these already. It wouldn’t be a bad idea to invest in one that also lists where your work can be found or how you can be contacted.
I’ve created my Created By stamps by using rubberstamps.com. I find it affordable, and rather easy to navigate myself. I’m even able to upload my Just a Note logo to use as well! If you’re interested in checking it out, I have this referral link for 20% off your order!
I hope this helps you get some ideas for the next time some asks you to create a collection of cards for them! As always, if you have any questions, please feel free to drop a comment on this blog, or send me a message through my contact page!
As promised, here are some details regarding the 5 card collection I made above!

Products Used:
Brutus Monroe- Snap Stamp Set (Retired)
Copic Markers (3 colors used per camera)
Verasfine Clair Nocturne Ink
Lawn Fawn Large Stitched Rectangle Stackables
Shimmerz by Buttons Galore
Kindred Stamps Advent Calendar Embossing Powder (Retired)
Blending Cardstock
Gina K Designs Envelopes
Art Glitter Designer Adhesive
Catherine Pooler Dye Ink
Combos:
Reds: Coral Cabana, Samba & Rockin’ Red
Oranges: Bellini, Orange Twist, Tutti Frutti
Yellows: Tiara, Catching Rays, Tiki Torch
Greens: Garden Party, Lime Rickey, Grass Skirt
Blues: Cummerbund, Aquatini, All That Jazz
Thank you so much for stopping by my blog today! I can’t wait to see what mass production cards you create next!
Justin
Be sure to follow me on Instagram at @justanotebyjustin for all my crafting projects!
Note: This blog does use affiliate links when possible. Please know that I only recommend products that I love and think you’ll love too!
Leave a Reply