
Let me be the first to tell you, the Kindred Stamps August Release is going to put a spell on y’all!! I am running amuck with excitement that I get to share with you one of the newest sets being released on August 27th: Salem Sisters (affiliate links used in this blog)! These witches have been gone for a while, but now these sisters are back (there may even be a bit of heck to pay)! Salem Sisters is a 6″ x 8″ stamp set containing 3 witchy sisters, a brother, his trick-or-treating younger sister, a zipped-lipped zombie, a cat, candle, spell book, and SO many fun sentiments! I’ve got 6 projects to share with you, and you may even find some magically spooky new products along the way!

Kindred Stamps Products Used:
Salem Sisters 6″ x 8″ Stamp Set
I Put a Spell on You Die
Candy Cane Stencil
Kindred Spirits Enamel Dots
Other Products Used:
Copic Markers
Blending Cardstock
Catherine Pooler Inks: Grass Skirt, Spruce, Flirty Fuchsia, & Grape Crush
Prima Watercolor Accents
Card Mat Die
Colored Cardstock
For my first Salem Sisters project, I just have to share with you my favorite brand new die, I Put a Spell on You! This die measures about 4″ tall, and is going to be so dang perfect for all your halloween and magical crafting! I colored up the bossy witch, her spell book, and candle to use on this card.
To prepare my I Put a Spell on You die cut, I die cut the unit twice: once with light purple cardstock, and once with dark purple. I blended up 2 shades of purple Catherine Pooler inks (Flirty Fuchsia & Grape Crush) to get a nice magically purply ombré, and then splattered the die cut with water and metallic water color to give it a bubbly and shimmery look!
I prepared my background using 2 Catherine Pooler greens (Grass Skirt & Spruce) with the Candy Cane Stencil. Once I applied Grass Skirt, I shifted the stencil over to cover the Grass Skirt portions, and then blended Spruce. This stencil is perfect to get 2 different colored stripes!
I finished the card off with some Kindred Spirits Enamel Dots and it was ready to go!
Pro Tip: Don’t be afraid to move your stencil around for multiple applications. You never know what fun combination you may come up with!


Kindred Stamps Products Used:
Salem Sisters 6″ x 8″ Stamp Set
Pull & Slide Die
Graveyard Scene Craft Die
Tree Scene Craft Die
Grass Scene Craft Die
Snowfall Embossing Powder
Other Products Used:
Copic Markers
Blending Cardstock
Distress Oxide Inks: Crushed Olive, Forest Moss, Rustic Wilderness, Gathered Twigs
Black Soot Distress Ink
Prima Watercolor Accents
White Acrylic Paint
Colored Cardstock
It wouldn’t be a spooky card if you didn’t have a zombie popping up from out of the grave! I used the brother, sister and zombie from the Salem Sisters set to make a fun graveyard scene card that’s has a pull-tab element!
I used the Graveyard, Tree, and Grass Scene dies to create a spooky and forested graveyard! I love that you can use these dies together to really look like your colored up images are smack dab in the middle of the action! I used the Pull & Slide die to have a tab you can pull, which will cause the zombie to jump out from behind the gravestones!
I also thought it would be fun to make a non-traditional sky color. So, being inspired by the zombie, I decided to make the sky an eery green color!
Pro Tip: Skies do not have to be blue! Make them whatever color you think will fit your project best! I usually like to do a One Color Family ombré (or at least make it look like I am using one color). I always blend the darkest of the colors on the edges, working towards the lightest color on the bottom/center!

Kindred Stamps Products Used:
Salem Sisters 6″ x 8″ Stamp Set
Boo Die
Mystic Moons Stencil
Sentiment Strips Die
Snowfall Embossing Powder
Kindred Spirits Enamel Dots
Other Products Used:
Copic Markers
Catherine Pooler Inks: Orange Twist, Samba & Pixie Dust
Wild Lilac Glitter Glitz Gel
Card Mat Die
For my 3rd Salem Sisters project, I decided to feature the Strong-nosed Witch with the brand new Boo die! Just like the rest of the word dies, the Boo die also has a background matting die (not used above, but pictured under the card), which makes this die versatile!
I wanted to use the colors in this witch’s clothing and hair throughout the card, so I used Catherine Pooler Orange Twist, Samba & Pixie Dust inks to water color my background. These inks were also splattered onto my Boo die cut as well! I also used the Mystic Moons stencil (on sale, by the way!) and some Wild Lilac Glitter Glitz Gel to get a sparkly moon background!
Salem Sisters has the “Trick or Treat” sentiment, as seen in the project, which can be used with any spooky sets you own to create a Halloween card! I popped the sentiment onto a Sentiment Strip die cut, which I then heat embossed with Snowfall Embossing Powder!
Pro Tip: I often use my Catherine Pooler inks for watercolored backgrounds. I love how you can use some broad strokes for an imperfect background, that ends up being such a strong focal point for your project!

Kindred Stamps Products Used:
Salem Sisters 6″ x 8″ Stamp Set
Spooky Tree Die
Grass Scene Die
Snowfall Embossing Powder
Card Basics Die Set
Other Products Used:
Copic Markers
Blending Cardstock
Distress Oxide Ink: Forest Moss, Vintage Photo, Hickory Smoke, Milled Lavender & Wilted Violet
Black Soot Distress Ink
Twilight Ink by Catherine Pooler
Prima Watercolor Accents
White Acrylic Paint
Colored Cardstock
Masking Magic by Gina K Designs
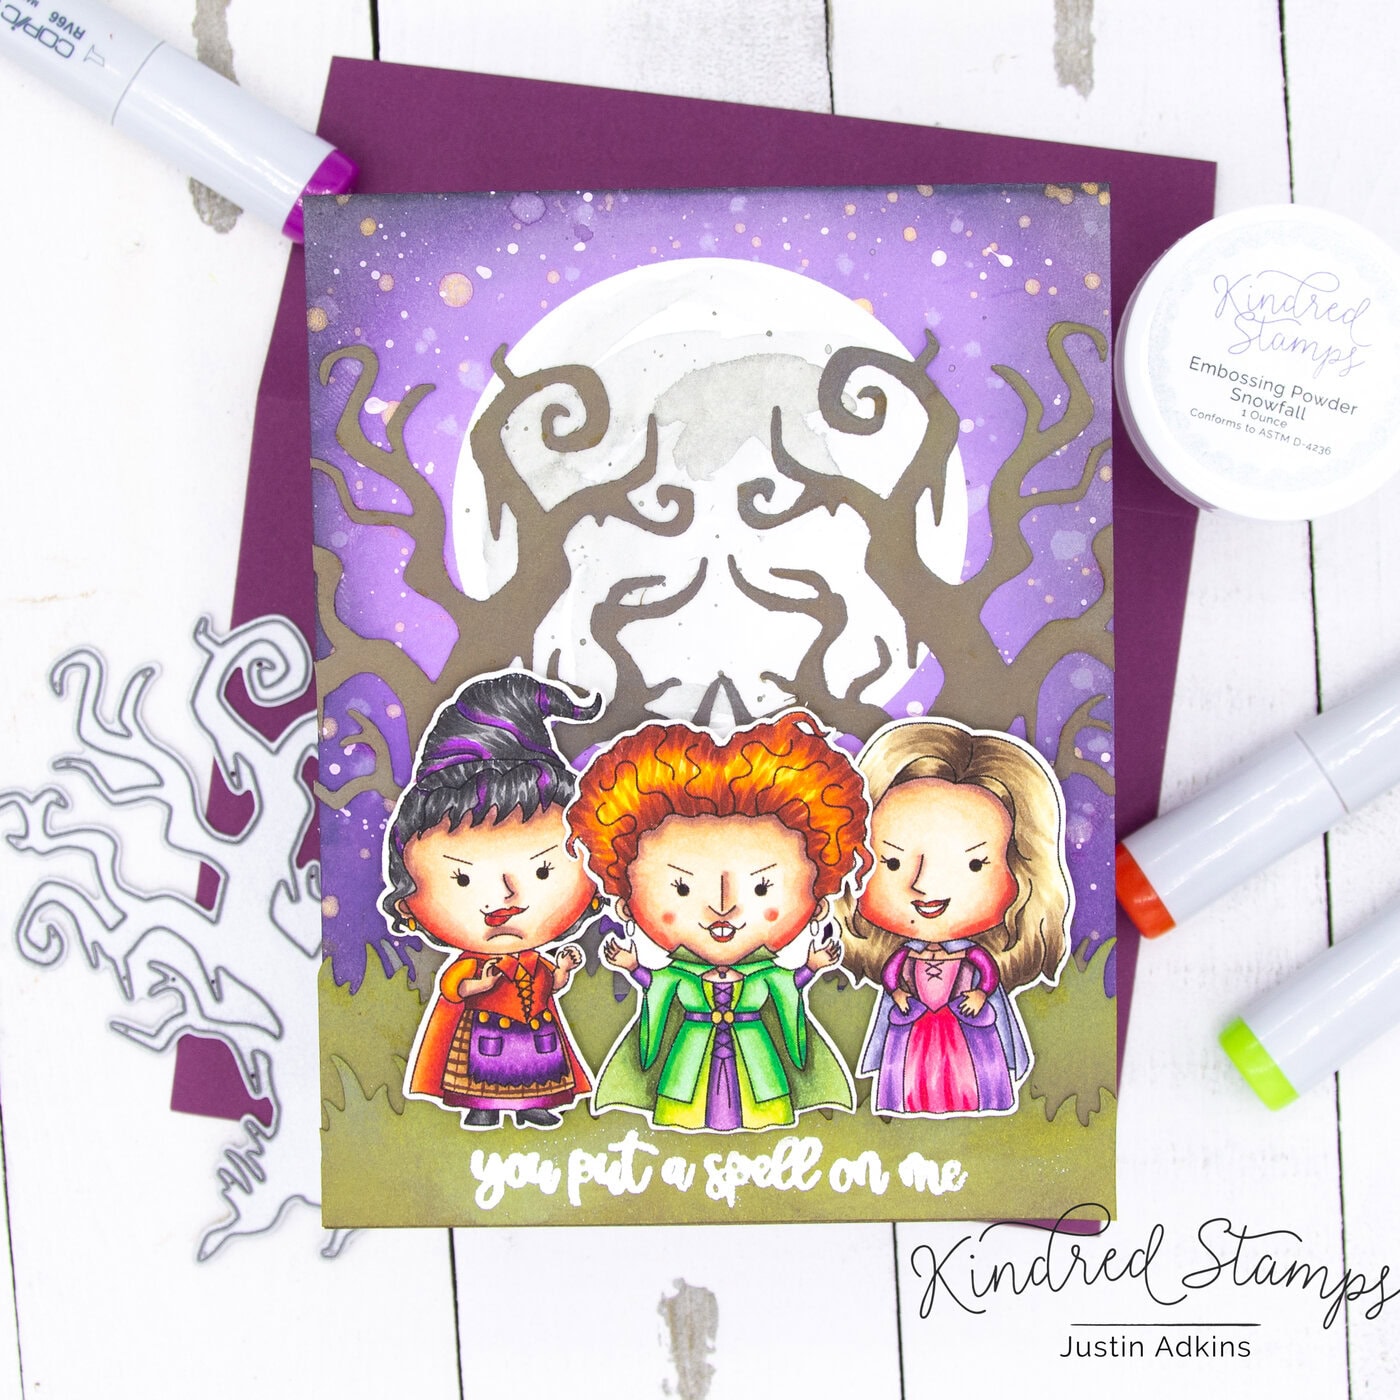
The Salem Sisters set just begs for you to make a magical project using this witchy trio together, and I couldn’t resist! After coloring up each of the sisters and fussy cutting them out, I used the brand new Spooky Tree die to create a hauntingly moonlit scene with these witches!
I distressed lime green colored cardstock with Forest Moss & Vintage Photo Distress Oxide Inks to give them an earthier vibe. For the spooky trees, I took a light brown cardstock and distressed the trees with Vintage Photo & Hickory Smoke Distress Oxide Inks.
Finally, for my sky, I die cut the smaller circle from the Card Basics Die set with Gina K Masking Magic, and covered up a portion of my panel for a moon. To create my night sky, I used Milled Lavender and Wilted Violet Distress Oxide Inks, finished with Black Soot Distress Ink on the edges of the sky. I also splattered some metallic water color and white acrylic paint onto the sky as well to make it look starry. When I removed the Masking Magic, I used Catherine Pooler Twilight Ink to watercolor some detail to make the circle look like a moon!
Pro-Tip: I love it when moons are included in night skies. To give your moon a bit of a glow, use your lightest sky ink color from your blend around the moon, and keep building up the darker colors from that! It looks like the moon has lit up your sky!

Kindred Stamps Products Used:
Salem Sisters 6″ x 8″ Stamp Set
Stained Glass Roses Stencil
Kindred Spirits Enamel Dots
Other Products Used:
Copic Markers
Blending Cardstock
Catherine Pooler Inks: It’s a Girl, Pucker Up, Flirty Fuchsia, Sangria & Queen for a Day
Card Mat Die
For my 5th Salem Sisters project, I wanted to use the Flirty Witch in a non-traditional witch theme. Being inspired by her garment colors, I created a project using all pinks and purples!
I have a 3 color ombre strip I used to feature the witch, using Catherine Pooler’s Pucker Up, Flirty Fuchsia & Sangria inks. I repeatedly stamped the sentiment “amuck” in Queen for a Day ink over this background strip as well.
For the main card panel, I used the Stained Glass Roses stencil and lightly blended It’s a Girl ink over it to make a soft rose background. I stamped the sentiment “Witches gotta stick together” in Queen for a Day in as well, and finished off the panel with some Kindred Spirits Enamel Dots.
Pro Tip: I originally intended for this card to be a 1-layer card, but my blended strip ended up slightly irregular. In lieu of starting over, I just cut the strip with a guillotine trimmer to give it a clean edge, and popped it onto a separate background piece! Be flexible when you are creating! Sometimes, it’s a huge relief knowing these little tricks that fix your mistakes in a matter of seconds!

Kindred Stamps Products Used:
Salem Sisters 6″ x 8″ Stamp Set
Harlequin Stencil
Card Basics Die Set
Sentiment Strips Die Set
Snowfall Embossing Powder
Kindred Spirits Enamel Dots
Other Products Used:
Copic Markers
Blending Cardstock
Pink & Main Gift Bag Die
Catherine Pooler Inks: Orange Twist & Grape Crush
Glitter Cardstock
Colored Cardstock
For my final Salem Sisters project, I wanted to use the cat from the set and color him up as a black cat, naturally! I used my blend and shift technique (similar to the I Put a Spell on You project earlier with the Candy Cane Stencil) to utilize the Harlequin stencil to cover an entire gift bag! I inked over the stencil with Orange Twist and Grape Crush Catherine Pooler inks.
I created a background for my cat by using the star die cuts from the Card Basics Die Set to cut some glittery stars from a dark blue violet glitter paper. I also heat embossed the sentiment “Trick or Treat” using Snowfall Embossing Powder on a black Sentiment Strip Die Cut! I finished off my bag using some Kindred Spirits Enamel Dots, and was all done!
And there you have it! Six projects using the brand new Salem Sisters stamp set that hopefully conjures up some inspiration for all your Halloween and magical crafting!
I have some news to share with you so you’re all ready to go for the Kindred Stamps August Release:
The entire Kindred Stamps August release will be available Friday, August 27 at 8am PST/11am EST. Be sure to subscribe to the Kindred Stamps blog to see a daily line up of sneak peeks from our amazing Design Team and see the full product release on Friday! Come join the Fan Club and release event to be part of the release fun, and you may just win some Kindred Stamps credit!!
Thank you so much for stopping by my blog today! I cannot wait to see what sorta spells you brew up in your craft room using Salem Sisters!
Justin
Be sure to follow me on Instagram at @justanotebyjustin for all my crafting projects!
Note: This blog does use affiliate links when possible. Please know that I only recommend products that I love and think you’ll love too!
Did you know that I have written a special blog post that I rank all of the current Distress Oxide colors?
Check it out if you haven’t yet! I have had a lot of great response from people who have used this list to start their Distress Oxide Journey!
Leave a Reply