

Before we jump into today’s project, I wanted to let you know that I sometimes use affiliate links to share my favorite products. Don’t worry, these links won’t cost you a dime – they’re just little crafty helpers behind the scenes that help support me if you use them to make a purchase! Let’s dive into today’s creative journey together!
Hello everyone! I’m storming the stage today and sharing a sneak peek of the brand new Kindred Stamps set, Leading Ladies! The Leading Ladies stamp set is part of the May 2024 Release and will be available this upcoming Friday, May 31st, 2024 at 8 AM PST on the Kindred Stamps website!
This stamp set features 7 different female characters that are no stranger to the stage! Stay tuned for the end of the post, as I have all the Copic combinations to share for these images! I created (6) project featuring these center stage starlets, so let’s get to some crafting!

Kindred Stamps Products Used:
Leading Ladies Stamp Set
Cityscape Die
Card Basics Die
Clear Embossing Powder
Prism Enamel Dots
Other Key Products Used:
Copic Markers
Distress Oxide Inks: Abandoned Coral, Lumberjack Plaid, Aged Mahogany, Hickory Smoke & Black Soot
Versafine Clair Nocturne Ink
Rainbow Glitter Paper
My first Leading Ladies project features the Murderous Jazz Duo on an ink-blended city background. These ladies definitely love the city, so I found the Cityscape Die the perfect addition to this card! I used the Card Basic Dies to help map out my scene!
Crafty Tip: Double up on your dies. For example, I used the stitched rectangle from the Card Basics Die set to make my background. But, I also used it to cut my Cityscape Die Cut to the perfect size, so that it would fit directly on top of my Rectangle Die Cut!

Kindred Stamps Products Used:
Leading Ladies Stamp Set
Stage Curtain Craft Die
Card Basics Die
Embossing Ink Pad
Snowfall Embossing Powder
Other Key Products Used:
Copic Markers
Distress Oxide Inks: Squeezed Lemonade, Fossilized Amber, Hickory Smoke, Black Soot
Holographic Metallic Paper
Gold Paper Splatter
Snowflake White Paper Splatter
Mint Tape
For my 2nd Leading Ladies card, I used the Nightclub Singer to create a card featuring a spotlight masking effect. I used the Card Basics Dies again to cut out my background, and then ink blended it using Distress Oxide Inks. I also heat embossed the sentiment “Have a Jazzy Celebration” with Snowfall White Embossing Powder, and then fussy cut the sentiment out for my project.
Crafty Tip: Invest in a low-tack tape. I, personally, use Mint Tape. A reliable low-tack tape will get a lot of use in your craft space. I use mine to help me mask off portions of my card, to hold my stencils in place, hold my dies in place when processing through my die cutting machine, and even to help keep things in tact with my cards “behind the scenes”.
Kindred Stamps Products Used:
Leading Ladies Stamp Set
Stage Curtain Craft Die
Card Basics Die
Embossing Ink Pad
Snowfall Embossing Powder
Other Key Products Used:
Copic Markers
Distress Oxide Inks: Abandoned Coral, Lumberjack Plaid, Aged Mahogany, Squeezed Lemonade, Fossilized Amber, Vintage Photo & Black Soot
Distress Ink: Lumberjack Plaid & Hickory Smoke
Rainbow Glitter Paper
Mint Tape
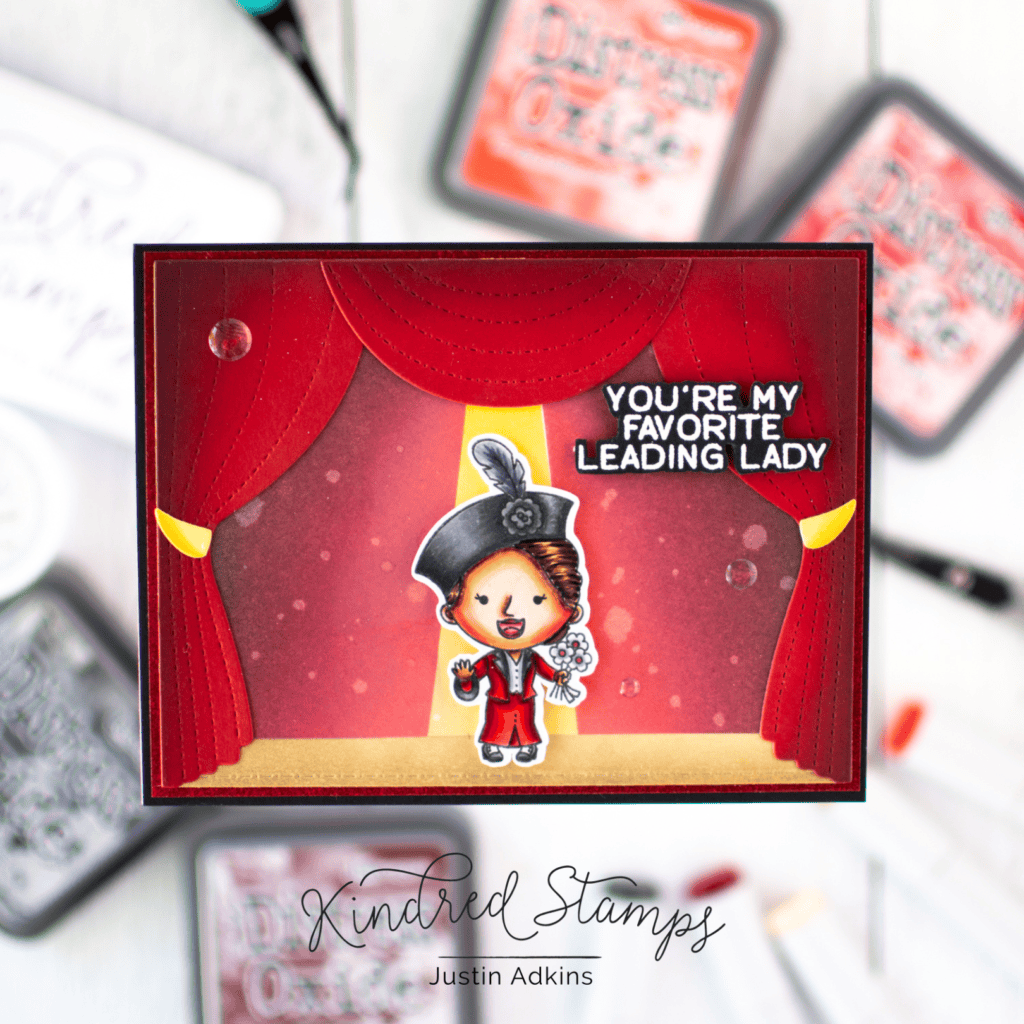
For my 3rd Leading Ladies card, I used the Humorous Lady character to create another stage scene, where she is front and center. I used the same spotlight masking technique that I used with the previous card to really put the focus on my featured character. Unlike my last card, I used red cardstock when die cutting my curtains for the stage, and distressed them to ensure that they looked like they had a shadowed edge.
Crafty Tip: Part of the key of creating a spotlight for a stage image is the inks you are using outside of the actual spotlight. For this card, you will see that, right outside of the spotlight, the ink is a lighter red, and then gets darker. This gives the illusion that the spotlight is really lighting up this space of the card!

Kindred Stamps Products Used:
Leading Ladies Stamp Set
Card Basics Die
Clear Embossing Powder
Prism Enamel Dots
Other Key Products Used:
Copic Markers
Distress Oxide Inks: Squeezed Lemonade & Fossilized Amber
Shark Tooth White Atelier Ink by Ink on 3
Versafine Clair Nocturne Ink
Rainbow Glitter Paper
Gold Paper Splatter
Gina K. Designs Masking Magic Strips
For my 4th Leading Ladies card, I am featuring the Little Orphan on a card with a very sunny background. I created my background without the use of a stencil, and just used Masking Magic Strips. I blended up my yellow ombré first, and then used the strips to create a sunburst effect. Using Shark Tooth White Atelier Ink, I blended over the area and removed the strips, creating a really fun sun-ray effect!
Crafty Tip: Use pigment inks for crisp sentiments. I love using the Versafine Clair inks to stamp out my sentiments. My key, though, is that I also set the sentiment using Clear Embossing Powder. This locks in my pigment ink and prevents any sort of smearing!

Kindred Stamps Products Used:
Leading Ladies Stamp Set
Distress Bricks Stencil
Stitched Alpha Dies
Retro Diner Paper Pack
Other Key Products Used:
Copic Markers
Distress Ink: Cracked Pistachio
Snowflake White Paper Splatter
For my 5th Leading Ladies card, I used the Baltimore School Girl to create a retro-style card with a custom “Good Morning” sentiment. I crafted up this sentiment using the Stitched Alpha Die Set. I also made a stenciled background by blending Cracked Pistachio Distress Ink over the Distress Brick stencil onto dark minty green paper, which I also splattered with White Paper Splatter. I placed my stenciled sentiment strip on-top of a retro blue print included in the Retro Diner Paper Pack, which I think fits this character’s vibe perfectly!
Crafty Tip: When using an alphabet die set to create a custom sentiment, I recommend laying out your sentiment some sort of grid mat (or something to help keep your letters straight). I then carefully apply a strip of Mint Tape over the bottom-half of the die cut letters, applied adhesive to the letters, and then used the tape as a medium to apply the sentiment to my project. Then, I typically use a longer acrylic stamping block to hold my letters into place as I remove the tape.

Kindred Stamps Products Used:
Leading Ladies Stamp Set
Bubbles Stencil
Card Basics Die Set
Retro Diner Paper Pack
Clear Embossing Powder
Other Key Products Used:
Copic Markers
Distress Ink: Candied Apple, Lumberjack Plaid, & Vintage Photo
Versafine Clair Nocturne Ink
Rainbow Glitter Paper
For my final Leading Ladies card, I used the Pie Lady image to create a super sweet project! I had this idea of making my very own pie with a lattice top, using the the Card Basics Die Set as a base. I used pink paper and placed the Bubbles Stencil over top, and then used both Candied Apple and Lumberjack Plaid Distress Oxide Ink to blend up a cherry-inspired pie filling. Then, I used both of the circles in the Card Basics Die Set to create a circle frame from kraft cardstock, which I ink-blended using Vintage Photo Distress Ink. I used a weave-method to then take ink-blended strips of kraft cardstock and make them look like a lattice pie top.
Now, the truth is that when I went to go ahead and trim the edges of this lattice pie top off from my pink cherry-pie die-cut, it didn’t look overly pretty. However, I went ahead and adhered my kraft circle frame directly on top of the image, which concealed all the non-pretty edges!
I adhered my pie element to a Retro Diner Paper background, added a sentiment and a few embellishments, and this card was complete!
Crafty Tip: Sometimes we make mistakes when it comes to our crafting. I like to call them “blemishes”. I like to think about different ways that I can cover up or conceal the blemishes when they happen! Sometimes, it’s with embellishments. Other times, I like to splatter the blemished area with ink, paint, or sometime similar! I also sometimes use die cuts to help cover up those areas as well!
And there you have my (6) projects using the new Leading Ladies stamp set!
As promised, here are the Copic Marker combinations that I used for each of the characters!
Midwest Jazz Duo
Skin (Both): E04, E11, E21, E00, E000, R22, R20
Lips (Both): R37, R24, R22
Black Hair: T8, T6, T4, T2
Blonde Hair: E47, E44, E42, Y00
Black Leotard & Shoes: N8, N5, N2, Gel Pen Accents
Silver Leotard & Shoes; C5, C3, C1, Gel Pen Accents
Baltimore School Girl
Skin: E04, E11, E21, E00, E000, R22, R20
Hair: E49, E59, E57, E55, E53
Shirt & Teeth: C3, C1, C00
Yellow Skirt: E35, Y19, Y15, Y11, B34 (Plaid)
Blue Bow: B37, B34, B32
Shoes: T7, T5, T3
Little Orphan
Skin: E04, E11, E21, E00, E000, R22, R20
Hair: E18, E08, R37, R08, YR18, YR15, R12
Dress: R39, R29, R24, R22
Dress Whites, Teeth & Socks: C4, C2, C00
Shoes: T7, T5, T3
Nightclub Entertainer:
Skin: E04, E11, E21, E00, E000, R22, R20
Black Hair: T8, T6, T4, T2
Lips: RV34, RV32, RV10
Teeth: C4, C2, C00
Suit & Hat: N7, N5, N3
Purple Hat Ribbon: V28, V25, V22, V000
Humorous Lady
Skin: E04, E11, E21, E00, E000, R22, R20
Hair: E49, E59, E57, E55, E53
Suit Trim, Shoe Grays & Hat: N7, N5, N3
Feather: C7, C5, C3
Dress: R39, R29, R24, R22
Dress Whites, Shoe Grays, Ribbon & Flowers: C4, C2, C00
Flower Centers: RV34
Lips: R24
Tongue: RV14, RV13, RV10
Mouth: RV34, RV32, RV10
Pie Lady
Skin: E04, E11, E21, E00, E000, R22, R20
Hair: E18, E17, E35, E34, E31
Apron Whites & Teeth: C4, C2, C00
Dress Blues: B14, B12, B000
Pie Top: E35, E34, E31
Pie Tin: C4, C2
I have some important information to share with you for the May Release!
The entire Kindred Stamps release will be available this Friday at 8am PST/11am EST. Be sure to subscribe to the Kindred Stamps blog to see a daily line up of sneak peeks from our amazing Design Team! Come join the Fan Club and release event to be part of the release fun, and you may just win some Kindred Stamps credit!!
Thank you so very much for stopping by to see my sneak peeks for the Leading Ladies stamp set! I cannot wait to see what you create with your haul from the Kindred Stamps May Release!
Happy Crafting!
Justin
Be sure to follow me on Instagram at @justanotebyjustin and subscribe to my YouTube Channel for even more crafting inspiration!
Note: This blog does use affiliate links when possible. Please know that I only recommend products that I love and think you’ll love too!
Did you know that I have written a special blog post that I rank all of the current Distress Oxide colors?
Check it out if you haven’t yet! I have had a lot of great response from people who have used this list to start their Distress Oxide Journey!
Leave a Reply